Plumbing inspections catch leaks, clogs, and aging parts before they damage pipes or lead to expensive repairs. They also help homeowners save money by minimizing water bills through improved system efficiency.
Performing regular Ranger Plumbing Company inspections can also extend the lifespan of fixtures. This is because problems like corrosion and early wear can be resolved promptly, preventing accelerated deterioration that necessitates costly replacements.
Inspection Scope

A plumbing inspection is a thorough examination of the piping, fixtures, and water-related appliances in your home. It can range from cursory visual evaluations to detailed investigations utilizing camera technology for an in-depth look at sewer lines. Depending on the age of your property and the complexity of its plumbing, an inspection may take up to two hours or more.
To begin a plumbing inspection, plumbers clear the areas around fixtures like sinks, toilets, and showers to ensure they can examine components without interference. They also check shut-off valves to ensure they work correctly and are easy to access in case of an emergency. Next, they check the condition of pipes and fixtures for signs of corrosion, leaks, or general wear. They also evaluate drainage pathways to ensure they’re free from clogs and other obstructions.
Clogged drains and sewer lines are a common problem, especially in older properties with aging pipes. These issues can lead to slow drainage, gurgling sounds, and unpleasant odors. Addressing clogs promptly protects pipes and fixtures from damage and reduces the risk of costly repairs in the future.
Leaks are another common problem detected during plumbing inspections, especially in homes with old or corroded pipes. Small leaks can quickly cause extensive water damage and promote mold growth, so it’s essential to identify them early. Luckily, plumbers have the tools and training to quickly find even hidden leaks.
An inspection of your property’s water pressure is also an important part of a plumbing inspection. Inspectors use a variety of tools to test your water pressure, checking for proper flow and ensuring all fixtures are functioning properly. This assessment also helps in identifying any issues that could affect your home’s overall energy efficiency.
Inspecting your home or commercial property’s plumbing can reveal a wide range of problems, from leaking faucets to inefficient fixtures that waste water and money. Promptly addressing these issues can significantly reduce your utility bills and help preserve the lifespan of your plumbing system. Consistent plumbing inspections can also boost your property’s resale value.
Water Pressure Assessment
Plumbing inspections can detect hidden issues like water leaks, clogs, and worn-out fixtures. They also help homeowners take a proactive approach to home maintenance, lengthening the lifespan of all water-using fixtures.
A comprehensive plumbing inspection starts with a visual walkthrough of all sinks, toilets, bathtubs, showers, and exposed piping to identify any obvious problems. Plumbers will also check water pressure to ensure fixtures are working correctly. Leaks and corrosion are common plumbing concerns that can waste thousands of gallons of water annually. Using specialized equipment, plumbers can quickly locate these hidden leaks and fix them before they worsen.
Regularly scheduled plumbing inspections can also reduce utility bills by identifying inefficient systems and fixtures. This can save homeowners hundreds of dollars per year on water consumption alone. Additionally, it can save them from the expense and stress of sudden plumbing emergencies.
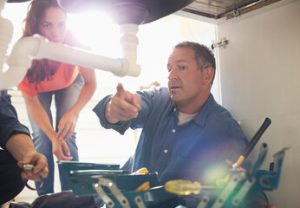
When choosing a plumber for routine plumbing inspections, it’s essential to find one with a solid reputation for professionalism and reliability. Licensed plumbers provide thorough evaluations, recommendations that follow industry best practices, and solutions that ensure your plumbing system is safe and reliable.
To assess your water pressure, simply screw a test gauge to the end of your spigot valve and turn it on. Then, compare the reading to the recommended range of 40 to 60 psi. If the pressure is lower than the recommended range, this may indicate a problem with the plumbing system.
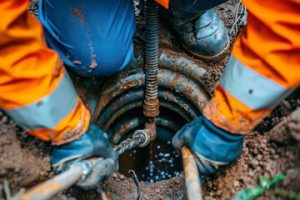
Plumbing inspections also include a look at the drain lines, sewer line, and any other underground pipes on your property. Plumbers use a camera scope to check for blockages, signs of deterioration, and other potential problems. They’ll also inspect the condition of the water heater, sump pump, and emergency shut-off valves to make sure they’re in good working order.
Plumbing problems that are left unattended can lead to expensive repairs and even permanent damage to your property. An annual plumbing inspection is the best way to catch these problems early and protect your investment. By keeping on top of routine maintenance, you can keep your plumbing running smoothly for years to come.
Leak Detection
Plumbing inspections identify the location and extent of hidden problems, like frayed seals or clogged drains. Rather than waiting for these issues to worsen, homeowners address them right away to prevent costly repairs and water damage. Proactive maintenance also extends the longevity of fixtures and ensures that pipes, valves, water heaters, and sewage lines operate properly.
Even small leaks can cause major water damage and promote mold growth if left untreated. Plumbing inspectors use advanced technology to locate these hidden leaks and provide quick, accurate repair services. The resulting peace of mind and lower repair costs help to protect household budgets and property values.
The inspection process also reveals operational inefficiencies that could save households money. For example, a plumbing expert may recommend upgrading to more efficient toilets or water-saving fixtures. The resulting savings on water bills contribute to environmental conservation efforts and reduce long-term costs.
In addition to identifying potential risks, plumbing inspections ensure that homes meet city building codes and adhere to best practices. For instance, inspectors assess water pressure and drainage, check for corroded or rusty components, and verify that appliances are installed correctly. Inspectors also explain these findings to homeowners, ensuring that they understand the plumbing inspection recommendations and how to implement them.
Annual plumbing inspections are essential for safeguarding home finances and preventing expensive problems. These services make your home more energy-efficient and help to lower water bills, while reducing the risk of plumbing emergencies and extending the lifespan of all plumbing fixtures. They also help to protect the integrity of your home’s water supply and ensure that your property’s value remains high.
For accurate and thorough plumbing inspections, homeowners must provide easy access to all areas that need to be assessed. By clearing entryways to crawl spaces, basements, and concealed nooks in advance, the inspection process is much faster and more effective. In addition, a clear path allows inspectors to examine each component without obstructions, ensuring that every part of the system is carefully evaluated.
Drainage Evaluation
A comprehensive plumbing inspection involves thorough evaluations of all water and sewer lines, ensuring they function properly. This is particularly crucial in older homes, where complex systems harbor worn or rusted piping and defective valves. In addition, a poorly functioning drainage system can result in wastewater buildup that puts the home at risk for damage and expensive repairs.
Plumbers use a variety of tools to detect issues like clogs, slow drains, and hidden leaks that can’t be easily discovered by the naked eye. Leaks in hard-to-reach places, such as behind drywall or under flooring, can go undetected for years, but catching them early with an annual inspection saves homeowners from costly repairs and reduces wastewater usage, providing both monetary and environmental benefits.
Annual plumbing system inspections also ensure that all fixtures are up to code and operating safely. In the city, specific regulations govern everything from permissible materials to proper installation techniques. Ensuring that all components meet these guidelines prevents damage, reduces maintenance costs, and increases the lifespan of the entire plumbing system.
The most important benefit of routine plumbing inspections is catching minor problems before they turn into major ones. Licensed plumbers identify clogs, leaks, and aging pipes before they cause significant damage or disrupt daily activities. They then recommend cost-effective solutions, offering transparency and trust to their clients.
Plumbing inspections can also identify inefficient water usage habits and encourage the adoption of sustainable practices. Changing simple behaviors, such as turning off faucets and showerheads when not in use, lowers water usage by 30% and cuts utility bills by a similar percentage.
In addition to lowering utility bills, plumbing inspections can help property owners sell their homes faster by addressing minor issues like outdated fixtures and septic tank repairs. Regularly scheduled inspections give buyers peace of mind that the plumbing is in good condition, and a well-functioning system will add value to the property.
Visit our Professional Services Blogs
Smart Choice Plumbing And Air, Sanitize My Airducts, Bethesda Locksmith, Golden Coast Cleaners, Advanced Concrete Staining, Home Pool Cleaners, Brayhines Septic, Shaka Pool And Spa Cleaning,Mr Clean And Shine, Best Appliance Repair Long Beach, Gulf to Bay Water Remediation, Garage Door San Francisco, Richmond Flooring, Fence Builders Woodlands, Colorado Springs Auto, Fuel Frontlines, Expert 24 Option, Sacramento Roseville Real Estate, SLO Homes, Philadelphia Towing, State Powerwashing, Truck Tires Worldwide, Website Translation, Construction Company Farmington NM, Green Home Los Angeles, Trinity SEO Marketing, Electric Fireplaces, Argos Bookkeeping, Christopherson Drywall,Garage Door Installation, Missouri Personal Injury Lawyer Blog, Alvins Auto Body, Carpet Care Pros, Las Vegas Concrete, Clark Concrete Company, Deck Builders Missour City, Lechleitner Builders, Medical Health Insurance Policy, Royal Siding Windows, Carpet Steam Cleaners Review, Go Greeen Lawn Painting, Oakwood Skate Deck, Texas Home Remodeling And Painting, USA Home Repair Remodeling, Dream Home Remodeling Services, Brent Lawn Homes, Great Ernm Homes, Accelerated Orthodontic, Arctic Cooling And Heating, Baltimore Heating And Airconditioning